
One assumption seems to underpin every article or book creating yarn: before you ever start spinning, you have a plan for your finished handspun. A specific project guides decisions about how to spin, which fiber to choose, the quantity to spin, the appropriate fiber prep, etc.
But what if you’re a new spinner who doesn’t feel ready to use your handspun? Or stranger still, you’re that rare fiber artist who is a process spinner, and your hobby is making yarn, rather than making things with yarn?
If you’ve followed this blog for a while, you know I fall into that second category. Creating yarn is a different hobby from both buying yarn, or using yarn. For me, supported spinning is a soothing tactile experience that keeps my fidgety fingers occupied and produces yarn as a byproduct! I love touching beautiful, soft fiber. I adore the challenge of artfully matching fiber with spindles. If I’m sitting still, my hands are usually busy coaxing a colorful braid into a one-of-a-kind yarn.
After mumble years of process spinning, I can assure you—spinners in this category can benefit from some planning before jumping into a spin. I think the root of my plycrastination and languishing unplied singles stems from this lack of planning. At least a little forethought prior to grabbing fiber and spindles (or wheel) can make the yarn finishing process much easier once those singles are complete.
The Article Series
This blog is the first in a series on choosing how to spin a dyed braid of combed top if or when you don’t already have a project planned for your yarn. Each post will cover one specific braid scenario and provide a discussion of several options to spin. The various options will include graphics to help visualize the results of the spin.
Note that these articles will not include “fancy” prep methods like fractals, rolags, or making custom-carded batts. I assume if you’re reading this, you—like me—just want to jump in and start spinning! But first… let’s plan.
Scenario 1: A Mirrored Gradient
In this scenario, the colorway in the combed top transitions from one end of the braid to the middle, and then “backwards” to the original color so the ends match. The braid I’m using for this study is The Balrog on a 85/15 BFL/Silk blend dyed by Fossil Fibers.
The first step is to understand the colors in your braid. Unbraid it so you can see the full color progression. I like to arrange the fiber on a neutral background in a roughly 3:4 frame so I can use that aspect ratio on my phone camera to snap a photo of just the fiber. Having a piece of white foam board on the side can brighten up any shadows.

Natural diffuse sunlight—like you see on a cloudy day—and a neutral background help you get a good photo of your fiber.

In the following sections, I used Canva to help me visualize the possible finished yarn, but you can use any graphics program you’re comfortable with, or even colored pencils on paper.
Option 1: Chain Ply or Unplied Singles
The braid is spun continuously from one end to the other: in this example, from orange through black, then back to orange. You then either chain ply the single yarn, or leave the singles unplied. This approach preserves the gradient exactly as the dyer created it.

When to Choose Option 1…
- To preserve the color gradient exactly as it was dyed
- You don’t want to weigh or measure your fiber to attempt to spin singles that are the same yardage
- Zero leftover singles (think luxury or sentimental fibers) from one bobbin or spindle having more yarn on it because you never can manage to spin single yarns of the same yardage, no matter how carefully you weighed and measured
- Chain ply: you tend to spin fine, and want a thicker finished yarn
- Chain ply: you want a round, squishy yarn
- Singles: you plan to use the yarn in weaving, or don’t mind the um, personality of fabric knitted with singles
Option 2: Two-Ply—Lengthwise Split
The braid is carefully split in half along its entire length, and each half is spun as one of the two plies. Weighing the fiber while splitting can help ensure each half will have the same amount of fiber by weight, although that doesn’t always mean each section will have the same yardage.

When to Choose Option 2…
- To preserve the color gradient, but with more marling and blending of the colors than a chain ply
- You want a two-ply yarn for knitting lace
- You have two bobbins or an even number of spindles
- You don’t mind carefully measuring the two lengthwise pieces as you divide the fiber, knowing full well that the two sections will still end up different yardages
Option 3: Three-Ply—Lengthwise Split
The braid is carefully split into thirds along its entire length, and each third is spun as one of three plies. Weighing the fiber while splitting can help ensure each third will have the same amount of fiber by weight, although that doesn’t always mean each section will have the same yardage.

When to Choose Option 3…
- To preserve the color gradient, but with more marling and blending of the colors than a chain ply
- You want a round, squishy three-ply yarn, but find the process of chain plying unduly tedious or challenging
- You have three bobbins or a number of spindles divisible by three
- You don’t mind carefully measuring the three lengthwise pieces as you divide the fiber, knowing full well that the three sections will still end up different yardages
Option 4: “Unmirrored Gradient”
You want to preserve the gradient but only from the center to the end, i.e., without reflecting or mirroring the colors as the braid was originally dyed. Two different methods can achieve this result.

Option 4, Method 1: Horizontal Split
The first method entails dividing the braid in half crosswise at the center, then spinning both halves from their respective end (orange, in this case) to the middle (black).
When to choose this method…
- It is simpler to weight and measure when you divide the braid in half across, rather than lengthwise, because it’s a shorter distance
- You want a two-ply yarn for knitting lace. OK, you could technically combine and then re-divide the two halves into thirds, for a three-ply, but I’m trying to keep this simple!
- You have two bobbins or an even number of spindles
Note: I have heard that if you change the direction in which you spin combed top, the fiber may not draft as smoothly since you’re drafting in the opposite direction from how the mill processed the wool. If you encounter this issue, additional fiber prep (fluffing, steaming, or predrafting) might help.
Option 4, Method 2: End-to-End
In the second approach, the braid is spun end-to-end and plied from a center-pull arrangement: either a cake, a ball, or a plying bracelet (sometimes called Andean plying).
When to choose this method…
- You don’t want to weigh or measure fiber for singles, you just want to spin!
- Zero leftover singles (think luxury or sentimental fibers) from one bobbin or spindle having more yarn on it because you never can manage to spin single yarns of the same yardage, no matter how carefully you weighed and measured
- You have only one bobbin or an uneven number of spindles.
- You want a two-ply yarn for knitting lace.
- You have a cake winder to create a center-pull cake to ply, and something to keep in the center of the cake so it doesn’t collapse on itself as plying nears the end.
- OR you have a small amount of yarn for a plying bracelet—or a larger amount of yarn and a specially-designed plying tool—and you never lose track of which way you were wrapping the singles and end up with a tangled mess. Or is that only me?
Option 5: Reversed Mirror
Here, the braid is split half crosswise in the middle, and each half is flipped to reverse the color progression. The color that had been at the two ends (orange, in this example) will now be in the center of the finished yarn. This requires at least a little forethought to future projects. For instance, if I wanted to make a shawl from this yarn, I would probably prefer black at the top edge where it would be closer to my face, rather than orange.

This color approach can be spun with any of the first three methods: chain ply or left as singles (Option 1); two-ply split lengthwise (Option 2); or three-ply split lengthwise (Option 3).
The same note about flipping the direction of the braid while spinning—originally mentioned in Option 4—applies here as well.
Option 6: Translated Gradient
For a translated gradient, split the braid in half crosswise in the middle, and reverse the color progression of one half of the braid. The color progression for half the braid will now repeat for the second half, instead of being mirrored at the middle.
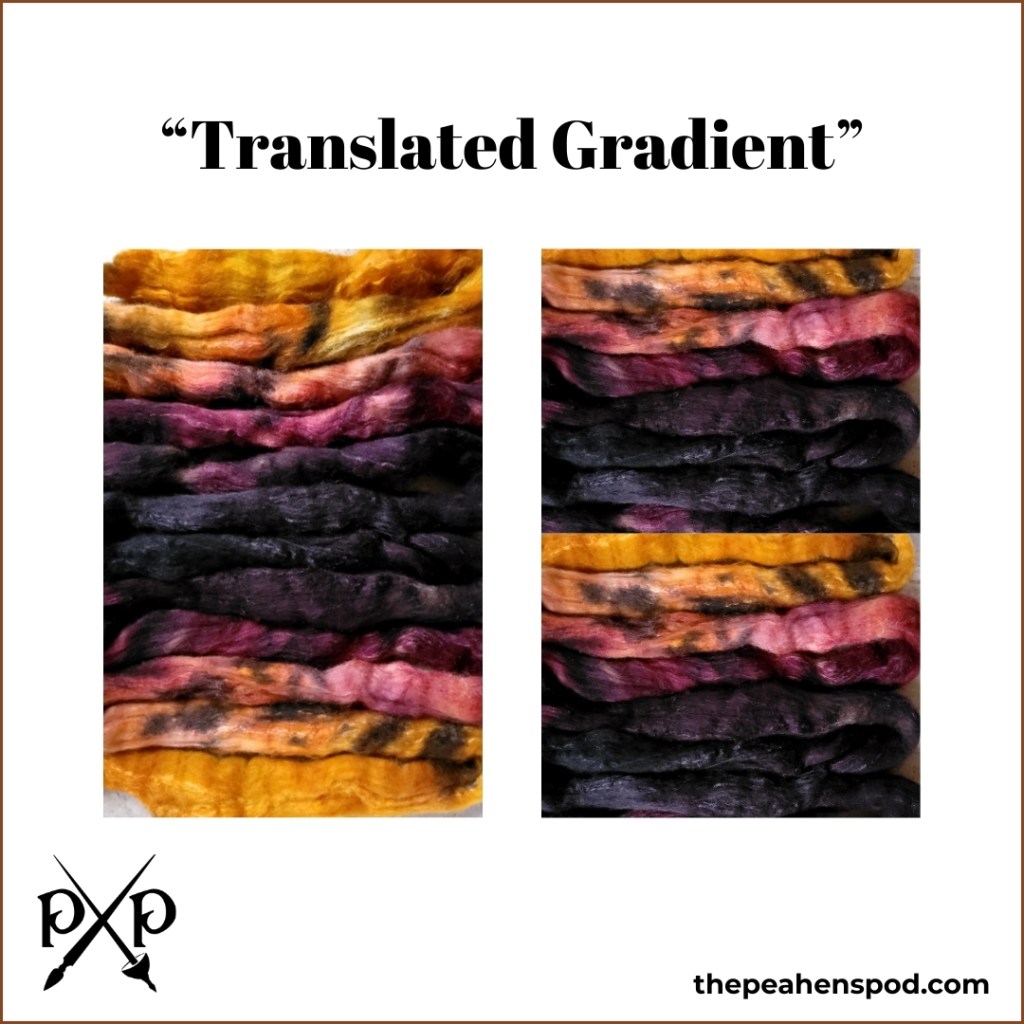
This color approach can be spun with any of the first three methods: chain ply or left as singles (Option 1); two-ply split lengthwise (Option 2); or three-ply split lengthwise (Option 3).
The same note about flipping the direction of the braid while spinning—originally mentioned in Option 4—applies here as well.
The Peahen’s Plan
I decided to spin The Balrog braid end-to-end across four supported spindles.

This approach gives me the flexibility for either a chain-plied yarn that preserves the gradient (Option 1) or an “unmirrored gradient” two-ply yarn from a center-pull cake (Option 4, Method 2).
- So far—about halfway into this spin—the singles are turning out to be very fine, so chain plying will offer a thicker finished yarn.
- However, a chain ply creates little bumps where the yarn doubles back on itself as it forms the chain. I’m worried the bumps may be more dramatic in a really fine yarn.
- Chain plying can also put adjacent areas where the yarn is underspun, or drafted too thin, in the same chain which would create a weak spot in the plied yarn. If I decide on the chain-ply option, I’ll use a plying ball so I can make the chains long enough (if needed) to minimize this problem. This challenge is less likely with a two-ply yarn because the weak spots pair up with an entirely different section.
- The only time I tried a center-pull cake for plying, I found it very difficult to handle both ends of the yarn feeding from the inside and outside of the cake. In addition, as the cake gets smaller it runs the risk of collapsing and causing a tangled mess. As much time as it takes to spin supported, I’m not sure I’m willing to take that risk.
- A two-ply yarn from a center-pull cake would ensure at least one end of the yarn is black, rather than both being orange. As previously mentioned, black would look better against my face if I (eventually) knit a shawl or scarf.
- Both options will efficiently use all the spun singles, leaving me with no extra yardage.
- A chain-ply will offer the rounder cross section of a three-ply yarn, and the two-ply will feature an edgier cross section better suited for lace.
Whew! That was a lot. Stay tuned for a future post on what I eventually decide to do, and how the final yarn turns out.
By the way, this article series on planning a spin will eventually be published together in one complete ebook for ease of reference. In the meantime, each segment will be posted to this blog as it is completed, so you also have the option of reading for free here.

[…] This is the second article in my new series, “Planning for Painless Plying.” The guides in these articles are primarily intended for new spinners and process spinners. If you missed the first article on planning to spin a mirrored gradient, you can find it here. […]
LikeLike
[…] tends to be gradient-dyed, with colors marching along in progression from one end to the other or mirrored about the middle. These rolags, by contrast, might be best described as having a “tonal variegation.” (I […]
LikeLike