
What a long, strange trip it’s been!
Just kidding. It hasn’t been strange at all. Just, really, really long.
Three months later, I finally finished my Spring Spinalong project, Tickled Pink by Inglenook Fibers. This post discusses how the spin went, both in terms of process and results.
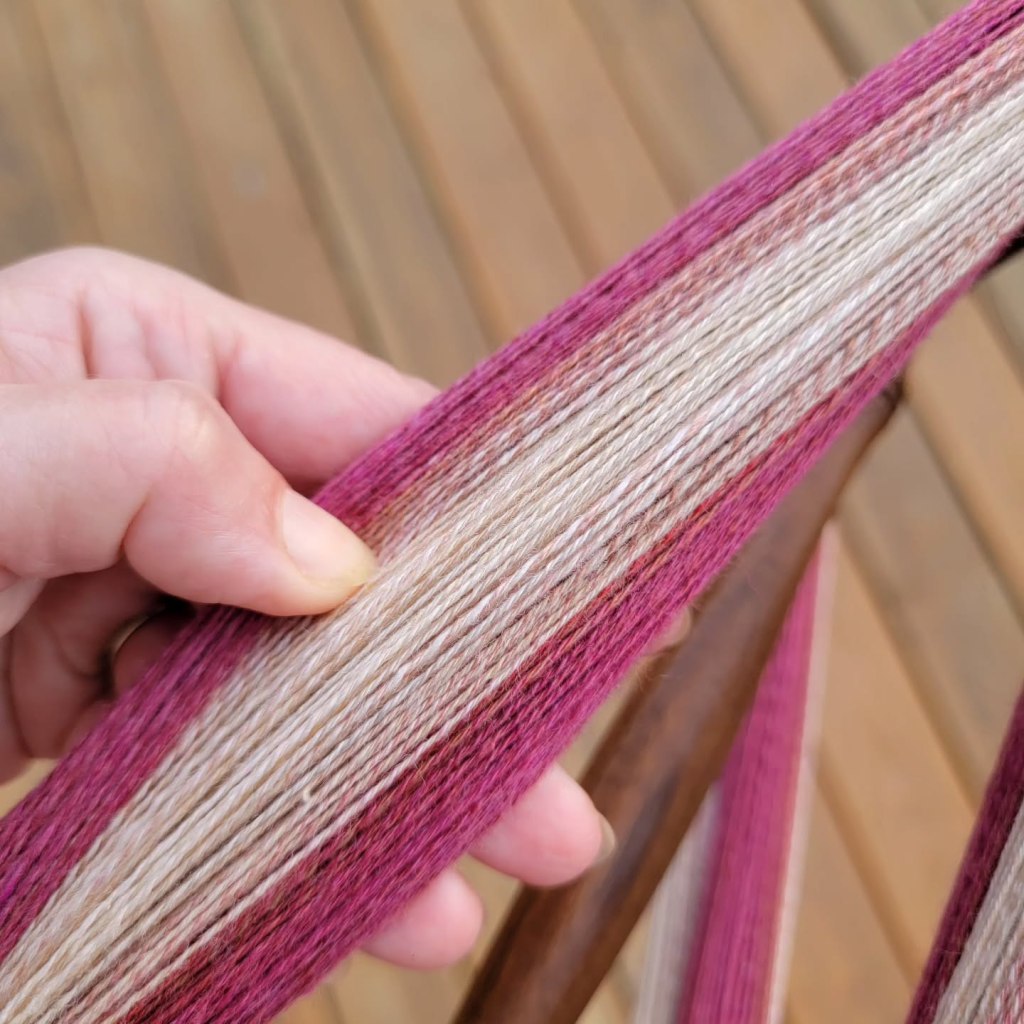
But first, a glamor shot of the finished yarn.

The Tickled Pink yarn measures 1,000 yards and weighs 147 grams. In grist measurements of yards per pound (YPP), that’s 3,085 YPP. (Thanks to Debbie Held and Sweet Georgia Yarns for having the formulas online.) If you prefer a less-math-intensive measurement, the yarn appears to be about 26 wraps per inch, i.e., lace-weight.

Color Management
First of all, let’s talk about color. As carefully as I processed the fiber to arrange the color progressions just so, I made two critical mistakes.
Mistake #1: Blending fiber is like blending paint. It works best to start with your lighter color and add small amounts of the darker color to reach your desired outcome. If you start with the darker color, you must add a greater quantity of the lighter color to see any difference. For Tickled Pink, this primarily impacted the transitional areas between two colors. I realized too late that many of my transitions were barely distinguishable from the darker side of the transition, rather than being an even visual mix of both colors.
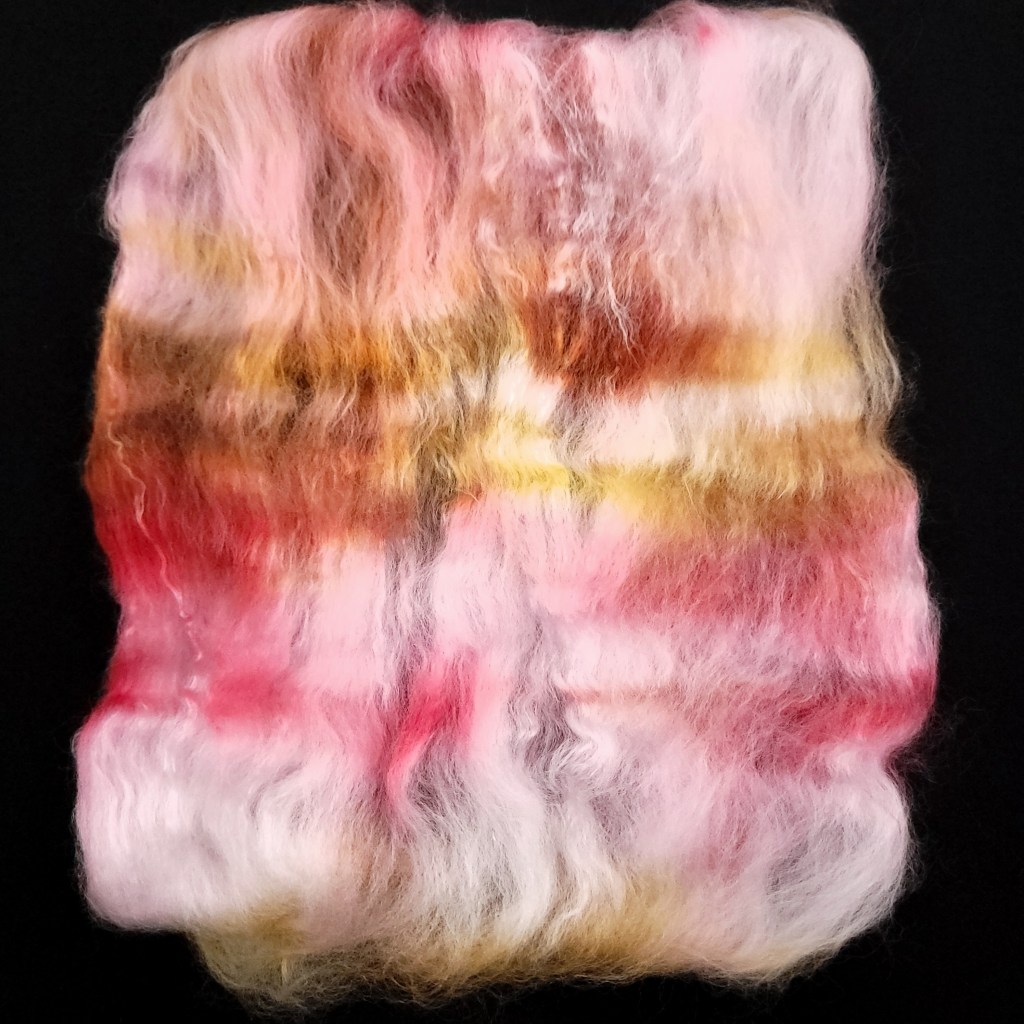
Mistake #2: The variation within each of the Tickled Pink colors was more complex than I had realized when I classified them into dark pink, medium pink and white categories. For example, the following photo shows all the colors—white, orange, gold and pink—to be found in a chunk of fiber I so loosely labeled medium pink.
I was partway into spinning the first ply when I realized the variability in each chunk of fiber. I hadn’t kept track of any kind of predrafting, and I certainly wasn’t blending the colors thoughtfully. I decided to finish the first ply as I had started it, consistently inconsistent in my approach.
On the second ply, I used my blending board to lightly blend the colors of each chunk prior to spinning. (You can see a video on Instagram here.) However, I was unhappy with the additional neps I encountered as I spun. This was probably due to fibers tangling up in the teeth when I laid down strips of the combed top too fast.
For the third ply, I teased apart the chunks of fiber by hand, realigned them, pulled them apart again, and then predrafted them prior to spinning. This achieved a light amount of blending without introducing neps.
For the record, I couldn’t tell a difference between the plies in the final yarn, so I can’t say which approach worked best! From a process perspective, I enjoyed blending lightly by hand the most (ply #3). It could be done anywhere with no additional equipment, and did not introduce as many neps as my clumsy use of the blending board had.
Spinning
One of my goals this spin was exploring lighter, rather than heavier, spindles.
In past spins, I lamented my weak hands and pushed myself to pack more fiber onto each spindle. My max was a whopping one ounce of fiber per spindle! While that sounds impressive, heavier supported spindles can actually be counterproductive. As the cop accumulates, the spindle rotates slower and you have to flick more frquently to get the same amount of twist into your yarn. At the same time, you also have to flick harder to get the spindle to spin due to the increasing weight. No wonder my hands hurt!

(Yes, I realize this photo looks almost identical to the end of the first ply, shown here. I thought I had selected the wrong photo, but the grain of the spindle whorls is slightly different between the two photos.)
Because I spread 150 grams (5.3 oz) of fiber across four spindles three times (I used the same four spindles for each ply), the total weight of fiber per spindle only needed to be 12.5 grams (0.44 oz). For the first two plies, I spread the weight of the fiber across the four spindles uniformly. Going from left to right in the photo above:
- Pink spalted holly ninja: 22.5 grams; plus 12.5 grams of fiber, target weight = 35 grams
- FNG: 30 grams; plus 12.5 grams of fiber, target weight = 42.5 grams
- Pink ivory ninja: 25.5 grams; plus 12.5 grams of fiber, target weight = 38 grams
- Hawthorn Craze ninja: 22 grams; plus 12.5 grams of fiber, target weight = 34.5 grams
While this approached worked fine, the spindle affectionately known as FNG ended up unpleasantly heavy as I spun with it. For the third and final ply, I added however much fiber it took to make the spindles all weigh the same once full:
- Total fiber weight = 50 grams
- Total spindle weight = 100 grams
- (50+100) spread over 4 spindles = 37.5 grams total weight for spindle and fiber
This meant no single spindle ended up significantly heavier—i.e., slower, and as a result adding less twist—than the others.
While spinning with less weight per spindle was kinder to my hands, it did not make the spin go any faster. It took a whopping 73 days for me to finish spinning all three plies. I only took a few breaks from spinning that entire time.
I also forgot how very tedious long blocks of color can be. That’s another factor I’ll have to remember for future spinning projects!
Plying Prep
Since I only used four spindles for 150 grams (5.3 oz) of fiber, I had to wind off each ply onto a separate storage device to await plying. Originally, I used a metal straw for a bobbin but luckily I was able to pick up more Daedalus Starling bobbins at this year’s MD Sheep & Wool Festival. Since I now had enough eSpinner bobbins, I rewound the metal straw bobbin using the Starling in bobbin-led (rather than my usual flyer-led) mode.
As spinning ended, I realized I wanted a new eSpinner bobbin plying kate. I still had the one I had designed for the Fractal Spinalong, but it never felt particularly stable. In addition, after reading the Tension issue of Ply magazine, I decided I needed tension on the bobbins to improve my plying experience. After a few hours researching the existing tensioned plying kates available on the retail market, I decided to design and laser cut one of my own. The design is inspired by the Schacht tensioned kate, but engineered to breakdown between uses thanks to tusked tenon joints for the crosspieces. (Medieval furniture building techniques for the win!) You might also notice I used the same metal straws and silicone gaskets in this kate as I did in my previous design.

Two design notes here. #1: The binder clips were supposed to allow the plies to feed smoothly off their respective bobbins without tangling. In practice, the slight sideways tug from the yarn going through the binder clip handle made the bobbins screech horribly when they turned. I didn’t discover this until near the end of plying, after driving everyone in the house crazy for days.
Design Note #2: While I added a cord to tension the bobbins, the friction of the bobbins against inside walls of the kate provided enough tension that I didn’t need the cord.
However, the very notion of tensioning had an unexpected bonus—I realized you could tension the spindles in a Spanish Peacock spindle plying stand. I designed this stand eleven years ago and only just figured this out!

(Yes, I love binder clips and use them for everything.)
I simply added an extension spring, a cord tensioner, and a cord looped once around the spindle shaft. Magically, the spindle no longer spun freely which eliminated the extra slack in the yarn and subsequent unwanted pigtails. All backspin also abruptly stopped. Unfortunately, I was reeling the yarn off the final spindle before this idea dawned on me, but I look forward to further experiments—and yes, a how-to video for other spinners who want to try it!
Plying
Here’s irony: I conceived of this spin as part of my Painless Plying post series. I put so much thought into this yarn, plying should have been easy.
And yet, the actual plying was full of toil and woe. I only took a short break between spinning and plying, and by June 16, 2025—a mere three days after I finished spinning—plying was underway. Unfortunately, for me plying requires more concentration than spinning, and thus is harder to fit into my usual daily activities. Plus, while the Starling itself is quiet, the screeching of the bobbins in the plying kate interfered with most other plying-friendly activities like conversations or watching TV.

Unfortunately, a little over halfway through plying—as gauged by the color progressions in the yarn—I realized something was terribly wrong. One ply was well into the middle pink shade, while the other two were still white. This indicated that one bobbin held much less yarn than the other two.
This is always a risk when spinning separate plies for your yarn, rather than plying one yarn to itself (either by chain plying or using a center-pull ball). I should have more carefully weighed the fiber for each ply, although my experience has shown even if I weigh everything perfectly I might end up uneven yardages between the plies. I had counted on inconsistencies in weighing and spinning to balance each other out across the whole project. I was so, so very wrong.
Weighing the bobbins confirmed that one was lighter by several grams. A few grams doesn’t seem like a lot unless you are dealing with a very fine yarn! I tried winding some yarn off the other other two bobbins to hurry along their color transitions so the final yarn would not be lopsided. This barely seemed to make a difference, and the yarn features a lot of marling where one pink strand was set against two white ones. I found myself winding even more yarn off of the heaviest bobbin to force the colors to line up as intended.
Despite my efforts, the lightest bobbin ran out well before the other two.

I was left with a hard decision to make.
Do I end the yarn here, and ply the remaining bobbins as a separate two-ply skein? While this option would be easiest, the colors would stop abruptly and the yarn would lack the full progression of my original plan.
Do I chain ply the other two bobbins to add more yardage to the current skein, even though chain ply has a different texture due to the bumps formed when the yarn folds back on itself?
Or do I make the longest leftover ply—inferred by the heaviest weight—into a two ply (either with a center-pull ball or a plying bracelet), and ply it with the third bobbin?
I slept on the options, and decided to go for the most complicated, option #3. I struggled last time I used my “Handy Andy Andean Plying Tool”—I probably lost track of which way to wrap it somewhere during the process—so this time I used my mini nostepinne to wrap a center-pull ball.

(The gaffer tape helps keep the yarn more securely on my slippery-smooth nostepinne.)
Too late, I remembered I had a pink Plying Dragon which would have been the perfect size for this job. Not to mention, perfectly color-coordinated! But I was too far into winding the ball to switch to a different method.
Unfortunately, there is an unsightly lump where I transitioned to plying two plies from the nostpinne and the ply from the remaining bobbin. Eventually the center-pull ball ran out, and I chain plied what remained of the last bobbin to get just a little more yardage for my yarn. That resulted in another awkward transition section, which was so bad I had to cut it and tie a knot.
Final Results
Experiences like this compound my dread of plying! However, I am glad I went through the extra work of adding to the finished three-ply length, despite how tedious and cumbersome the process turned out to be. Otherwise, the amount of medium and dark pink would have been asymmetrical in the finished yarn.
But how well did my yarn results match up to my expectations? Here is a graphic which shows the yarn as I’d planned it originally compared how it actually turned out.
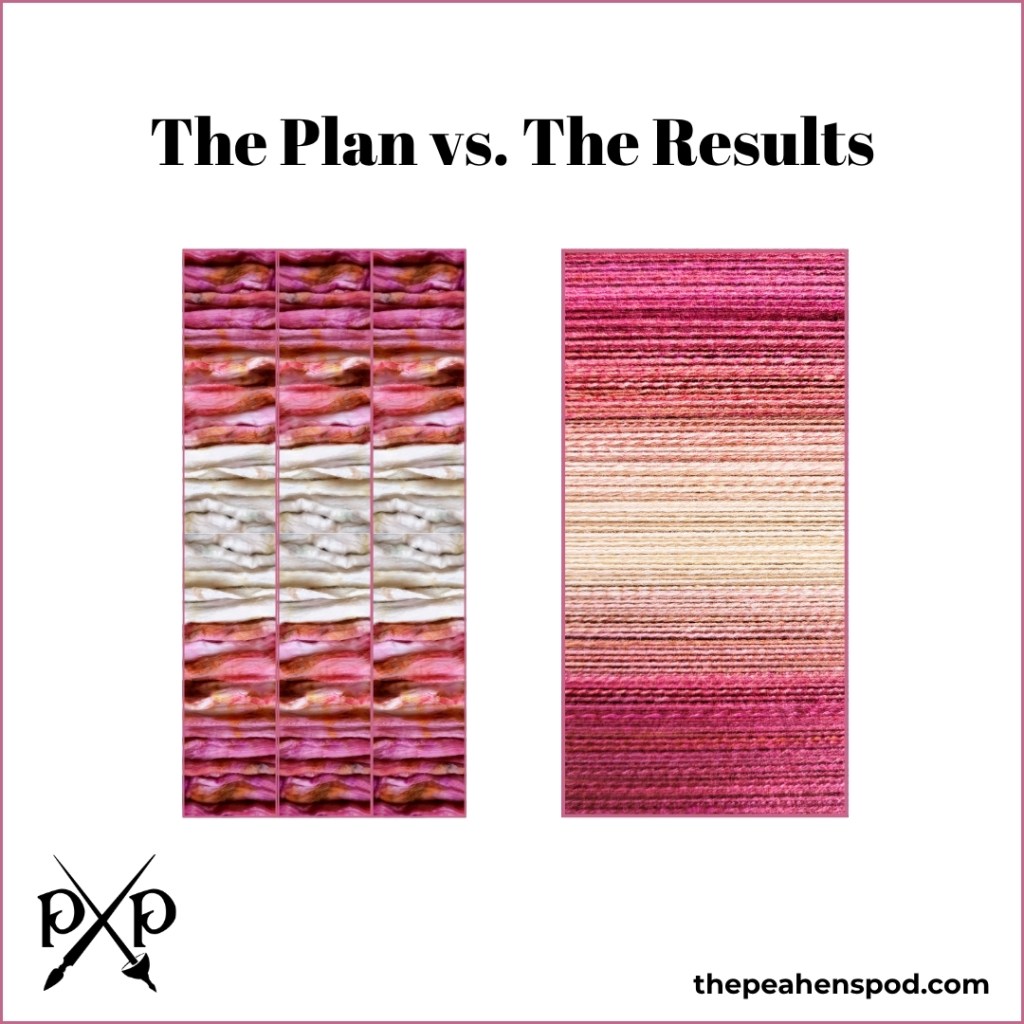
Three months later, the yarn is a perfect reflection of my vision.
And now, I am going to celebrate this year’s Tour de Fleece by spinning something that requires zero planning!

[…] the sport weight of the final product. This would probably work better than a three-ply gradient (like the Tickled Pink yarn) because there is no color progression to get out of sync between the three […]
LikeLike